How To Teach Plough Pose (Halasana): Includes 30 Modifications For Beginners, Intermediate & Advanced Students
Greetings, my lovely Yogis, Yoginis, and Yoga teachers. I’m George Watts, a BWY yoga teacher and creator of the Online Yoga Lesson Planner.
In this post you’ll discover how I teach Plough Pose (Halasana). I’ve included 30 modifications to make it accessible for all students. This deeply rejuvenating pose stretches the lower back and hamstrings, improves spinal flexibility, and promotes relaxation—learn how to guide your students safely and effectively!
You’re ready step one…
Step 1: Teach The Benefits
- Calms nervous system
- Stimulates abdominal organs & thyroid gland
- Stretches shoulders & spine
- Helps relieve symptoms of menopause
- Reduces stress & fatigue
- Therapeutic for backache
- Therapeutic for headache
- Therapeutic for infertility
- Therapeutic for insomnia
- Therapeutic for sinusitis
Step 2: Teach The Sanskrit
Halasana = plough pose
Hala = plough
Asana = pose
To remember Halasana imagine you’ve just taught a yoga class, but your car has broken down on the way home. So, you hail a cab (sounds like Hala) and for the cabbie’s tip you teach him/her plough pose.
Step 3: Teach A Preparation Pose
Prep Pose 1: Shoulderstand
- Begin in Shoulderstand.
- Exhale as you lower your right leg toward the floor behind your head.
- Inhale as you raise your right leg.
- Repeat this exercise for your left leg.
- Exhale as you lower both legs at the same time to move into Plough Pose.
Prep Pose 2: Spinal Rocking
- Do some spinal rocking.
- Move from Spinal Rocking into Plow Pose.
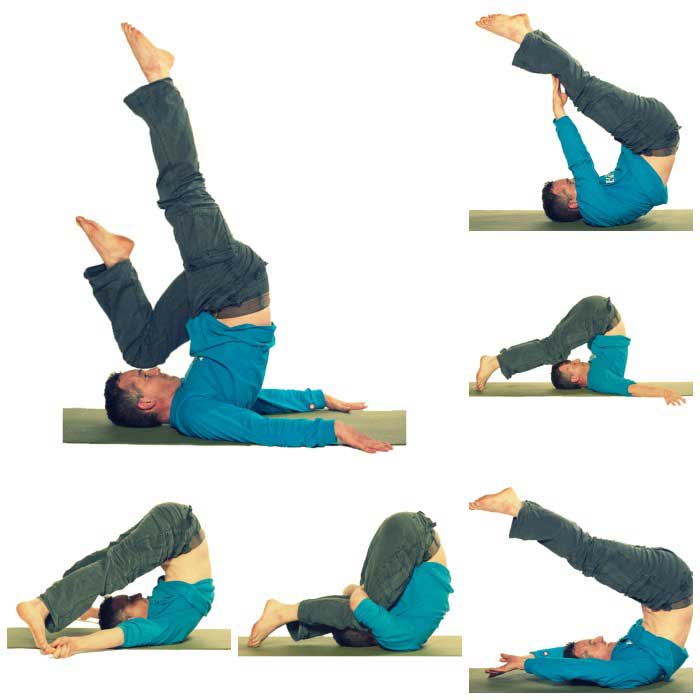
Step 4: Teach Plough

George in Plough pose
Start in Shoulderstand (Sarvangasana) – Lie on your back, bring your legs up toward the ceiling, and lift your hips, supporting your lower back with your hands.
Lower the Legs Overhead – Slowly lower your legs behind your head, aiming to bring your toes toward the floor while keeping the legs straight.
Keep the Neck Neutral – Ensure the head and neck remain still, with the gaze directed toward the ceiling to avoid strain.
Engage the Core and Lift the Hips – Activate the core muscles to support the lower back and keep the weight distributed evenly across the shoulders.
Adjust Arm Position – Keep the hands on the lower back for support, or extend the arms flat on the floor with palms down for a deeper stretch.
Breathe Deeply – Encourage slow, steady breaths to enhance relaxation and stretch the spine safely.
Hold the Pose – Maintain the posture for 5–10 breaths, ensuring comfort and stability.
Exit with Control – To release, engage the core, slowly roll the spine back down to the mat one vertebra at a time, bringing the legs back to the floor gently.
Step 5: Have A Few Mods Up Your Sleeve
Below are 30 modifications for Plough pose.
You obviously don’t need do know them all, but it’s handy to have a few mods up your sleeve. That’s me down there in a few of the modifications.
10 Beginner Modifications for Plough Pose (Halasana)
Beginner Modification 1: Legs on a Chair
Instead of lowering the legs to the floor, rest them on a chair. This reduces strain on the spine and makes the pose more accessible.
Beginner Modification 2: Use a Wall for Support
Perform the pose with feet resting against a wall. This provides stability and helps students gradually ease into the stretch.
Beginner Modification 3: Bend the Knees
Allow the knees to bend slightly rather than keeping the legs straight. This modification eases tension in the lower back and hamstrings.
Beginner Modification 4: Hands on Lower Back
Keep hands supporting the lower back rather than extending them on the mat. This provides extra stability and control while in the pose.
Beginner Modification 5: Use a Bolster Under the Hips
Place a bolster or folded blanket under the hips. This elevates the lower back and reduces pressure on the neck and shoulders.
Beginner Modification 6: One Leg at a Time
Lower one leg at a time toward the floor while keeping the other extended upward. This helps students gradually build flexibility and control.
Beginner Modification 7: Keep Hips Lifted
Instead of lowering the legs fully, keep them slightly raised above the floor. This prevents excessive strain and allows students to build strength.
Beginner Modification 8: Rest Feet on Blocks
If the feet don’t reach the floor, place yoga blocks under them. This modification provides a gentler stretch and improves comfort.
Beginner Modification 9: Practice at a Wall
Lie with hips near a wall and lift the legs overhead, resting them against the wall. This helps students feel the shape of the pose without full weight-bearing.
Beginner Modification 10: Hold for a Shorter Time
Encourage students to stay in the pose for just a few breaths before rolling back down. This helps them gradually build endurance.
10 Intermediate Modifications for Plough Pose (Halasana)
Intermediate Modification 1: Arms Extended on the Floor
Release the hands from the lower back and extend them along the mat. This deepens the stretch and encourages greater stability.
Intermediate Modification 2: Feet Flat on the Floor
Encourage students to rest the tops of their feet fully on the floor. This intensifies the hamstring stretch while maintaining spinal alignment.
Intermediate Modification 3: Hands Clasped Behind Back
Interlace the fingers on the floor beneath the body. This opens the shoulders and chest while enhancing the stretch.
Intermediate Modification 4: Engage the Core More
Ask students to focus on using their core to control the movement instead of relying on momentum. This increases strength and stability.
Intermediate Modification 5: Extend the Hold Time
Encourage students to hold the pose for 30 seconds to 1 minute. This helps deepen the stretch and improves endurance.
Intermediate Modification 6: Move Into Shoulderstand First
Begin in Shoulderstand before transitioning into Plough Pose. This strengthens the shoulders and core while refining the transition.
Intermediate Modification 7: Legs Wider Apart
Instead of keeping the legs together, separate them slightly. This allows for more flexibility and a different stretch in the lower back.
Intermediate Modification 8: Use a Strap Around the Arms
Wrap a yoga strap around the upper arms to keep the shoulders engaged. This helps maintain stability and proper alignment.
Intermediate Modification 9: Point or Flex the Feet
Experiment with pointing or flexing the feet to change the intensity of the stretch. This engages different muscles and adds variety to the pose.
Intermediate Modification 10: Dynamic Movement
Slowly lower and lift the legs in a controlled motion instead of holding the pose statically. This builds strength and flexibility over time.
10 Advanced Modifications for Plough Pose (Halasana)
Advanced Modification 1: Lift Onto the Toes
Rise onto the tips of the toes while in the pose. This increases spinal flexibility and deepens the stretch.
Advanced Modification 2: Bind Hands to Feet
Reach the hands back to hold the feet. This creates an intense stretch for the spine and hamstrings while improving balance.
Advanced Modification 3: One-Legged Plough Pose
Extend one leg toward the ceiling while keeping the other foot on the floor. This increases core engagement and balance.
Advanced Modification 4: Lotus Legs in Plough Pose
Cross the legs into Lotus Pose while holding Plough. This enhances flexibility and challenges hip mobility.
Advanced Modification 5: Move Into Ear Pressure Pose
Bend the knees and bring them to rest beside the ears. This intensifies the spinal stretch and adds an element of compression.
Advanced Modification 6: No Hand Support
Lift the hands off the floor and rest them on the thighs. This requires more core strength and balance.
Advanced Modification 7: Hands in Reverse Prayer
Bring the hands into a reverse prayer position behind the back. This adds a shoulder-opening element to the pose.
Advanced Modification 8: Feet on a Block Behind the Head
Instead of resting the feet on the mat, place them on a yoga block. This increases the challenge by requiring more control.
Advanced Modification 9: Transition Into Shoulder Stand or Fish Pose
Move from Plough into Shoulder Stand or Fish Pose as a smooth flow. This helps strengthen transitions between inversions.
Advanced Modification 10: Hold for Over a Minute
Encourage experienced students to hold the pose for 1–2 minutes. This deepens the stretch and enhances endurance.
Step 6: Give A Counter Pose
Ask your students to perform a counter pose that stretches their spine in the opposite direction, such as Cobra Pose.
Step 7: Get The Online Yoga Lesson Planner
Okay. You got me. This isn’t an official step, but it will save you a whole lot of time planning your yoga lessons. So, get out of plough pose, and get your yogic hands on Online Yoga Lesson Planner.