Butterfly III
| Sanskrit Name: | Baddha Konasana |
|---|---|
| Similar Pose Names: | cobler, Bhadrasana |
| Category: | Seated & Floor |
| Share on: |
|


 Yoga Lesson Planner
 Pilates Lesson Planner
| Category: | Pregnancy Lesson Planner |
|---|---|
| Sub Category: | Seated & Floor |
| Types: | Animal, Hip Opener, Seated, Seated & Floor, Stretch |
| Anatomy: | Core, Hamstrings, Hips, Knees, Lower Back, Middle Back |
| Chakras: | Base, Sacral Centre, Solar Plexus Centre |
| Therapy: | Anxiety, Eye fatigue, Poor Posture, Stress |
| Drishti: | Tip Of Nose |
| Dosha: | Kapha, Pitta |
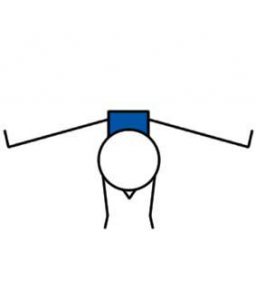
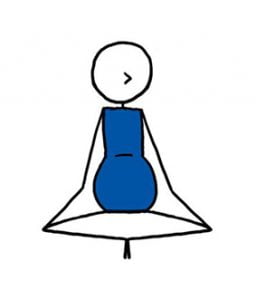
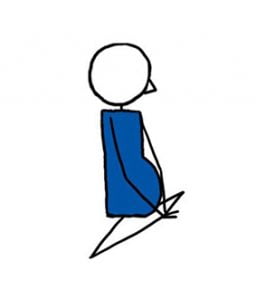
Sit in a comfortable seated position with plenty of space for belly. Extend one leg and bend other, placing foot high on opposite thigh as comfortably as possible. Hold the foot with one hand and rest other hand on bent knee. Inhale and let the knee lift slightly. Exhale and gently guide it down without forcing. Keep spine tall and torso steady. Repeat on other side.
Trimester 1, 2, 3. Open hips and inner thighs. Encourage gentle mobility through pelvis and groin. Support a tall seated posture with space for belly.
Beginner: Place foot lower on opposite leg and keep knee movement small. Intermediate: Hold foot and gently lift and lower knee with a tall spine. Advanced: Place foot higher on opposite thigh and add a slightly fuller range of movement without forcing the hip.
Sit on enough support to make space for belly. Keep knee movement slow and gentle. Avoid placing foot too high or pressing knee down if it causes hip, knee, pelvic, or lower back discomfort.
Click here for lots of FREE downloadable Yoga lesson plans.
Click here for lots of FREE downloadable Pilates lesson plans.
- Lucky Dip2
- Whole body 6 - sciatic nerve health (incls Tri2)
- Whole body 6 - sciatic nerve health (incls Tri2) - COPY -
- Ask Genie1
- Whole body 8 (incl Tri2)
- Whole body 9 (incl Tri 2)
- Pregnancy 1
- Pregnancy 1
- Ask Genie1
- Pregnancy sequence
- Week 3 - pregnancy
- Whole body 13 (incl Tri 2)
- sciatic nerve health
- Prenatal Lesson 1
- Whole body 30 (inclds antenatal)
- Ask Genie2
- Pregnancy 1
- Pregnancy week 1
- Pregnancy week 1
- PreNatal/Post Partum Class
- Week 1 of 6 - pregnancy
- Pregnancy sequence
- Ask Genie3
- Easter plan pregnancy
- April 5 | About Families
- Pre Natal Class
- pregnancy yoga
- Pregnancy sequence
- Pregnancy week 1
- Prenatal
- Piriformis Syndrome
- Ask Genie8
- Ask Genie1
- Pregnancy week
- Ask Genie4
- Ask Genie2
- peaceful warrior flow
- pregnancy seated and floor
- prenatal workshop
- Pregnancy week 6
- Prenatal Yoga Week 6
- Ask Genie2
- Ask Genie1
- Pregnancy week 6
- peaceful warrior flow
- Ask Genie 2
- Ask Genie 1
- Ask Genie 9
- Ask Genie 10
- Ask Genie 18
- Ask Genie 2
- Ask Genie 1
- Ask Genie 3
- Ask Genie 2
- Yin Yoga for Pregnancy 1st trimester
Butterfly III For Prenatal Yoga
Butterfly III is one of hundreds of exercises in the Online Pregnancy Lesson Planner.
If Butterfly I is the calm beginning and Butterfly II adds a little fluttery movement, Butterfly III brings the whole thing into a more focused, one-sided conversation. It is like the hip-opening trilogy nobody asked for but everyone quietly benefits from. First you settle. Then you soften. Then you give each side its own turn. During pregnancy, that can be surprisingly helpful, because one hip often behaves like a reasonable adult while the other acts as though it has been personally offended.
Butterfly III works beautifully after Butterfly I and Butterfly II because it keeps the same general theme of opening through the hips and inner thighs, but makes the movement more specific. It gives each side a little extra attention without turning the pose into a melodrama.
Why Teach Butterfly III in Prenatal Yoga?
Butterfly III is a lovely prenatal pose because it opens one hip at a time and adds gentle movement without rushing. That can be especially useful in pregnancy, when the pelvis is changing, the belly is growing, and one side of the body may feel tighter than the other for no obvious reason except pregnancy being pregnancy.
It also makes excellent sense after Butterfly I and Butterfly II. Butterfly I helps students settle into the shape. Butterfly II adds some light movement through both legs together. Butterfly III then gives each side its own moment, which can feel more spacious, more manageable, and often more revealing. It is a nice progression: first stillness, then flutter, then focused release.
And baby? Baby gets a calm seated posture, a gentle rocking rhythm, and a mother doing something kind and sensible instead of wrestling nobly with her own hips.
How to Teach Butterfly III for Prenatal Yoga
Sit in a comfortable seated position with plenty of space for the belly. Extend one leg and bend the other, placing the foot high on the opposite thigh as comfortably as possible. Hold the foot with one hand and rest the other hand on the bent knee. Inhale and let the knee lift slightly. Exhale and gently guide it down without forcing. Keep the spine tall and the torso steady. Repeat on the other side.
Teaching Tips for Prenatal Butterfly III
Prenatal Butterfly III works best when the movement stays soft and patient. The aim is not to pin the knee to the floor and look triumphant. The aim is to create gentle mobility through one hip at a time while keeping the spine tall and the breath easy.
Useful reminders:
sit on support to create more space for the belly
keep the knee movement slow and gentle
place the foot lower if the hip feels tight
keep the torso upright and steady
avoid pressing the knee down forcefully
treat each side as its own separate weather system
Think less “deep heroic hip opener” and more “wise pregnant woman negotiating peace with one leg at a time.”
10 Beginner Modifications For Prenatal Butterfly III
Beginner 1: Place the foot lower on the opposite leg and keep the knee movement small.
Beginner 2: Sit on a folded blanket or cushion to help the pelvis tip forward.
Beginner 3: Keep the extended leg slightly bent if sitting tall feels easier.
Beginner 4: Support the bent knee with one hand instead of moving it much.
Beginner 5: Hold behind the thigh instead of the foot if that feels more comfortable.
Beginner 6: Sit with the back lightly against a wall for support.
Beginner 7: Move the knee only a tiny amount with the breath.
Beginner 8: Practise one side at a time for just a few breaths.
Beginner 9: Place one hand behind the body for extra balance.
Beginner 10: Pause between sides and shake out the legs gently.
10 Intermediate Modifications Prenatal Butterfly III
Intermediate 1: Hold the foot and gently lift and lower the knee with a tall spine.
Intermediate 2: Sit on support and lengthen through the spine as the knee moves.
Intermediate 3: Keep the extended leg active but relaxed through the foot.
Intermediate 4: Inhale to lift the knee slightly and exhale to soften it down.
Intermediate 5: Hold the pose for three to five slow breaths on each side.
Intermediate 6: Keep the torso upright without leaning toward the bent leg.
Intermediate 7: Add a soft lift through the chest as the hip opens.
Intermediate 8: Slow the movement down and notice the difference between sides.
Intermediate 9: Rest the moving knee briefly between rounds.
Intermediate 10: Repeat the movement twice on each side with calm breathing.
10 Advanced Modifications Prenatal Butterfly III
Advanced 1: Place the foot higher on the opposite thigh and add a slightly fuller range of movement without forcing the hip.
Advanced 2: Stay taller through the spine while increasing the breath-led movement.
Advanced 3: Hold the foot more firmly and keep the torso completely steady.
Advanced 4: Practise five to eight slow knee lifts and releases on each side.
Advanced 5: Keep the extended leg long and gently active.
Advanced 6: Add a tiny forward tilt from the pelvis while keeping plenty of belly space.
Advanced 7: Stay longer on the tighter side without pushing.
Advanced 8: Move slowly enough to feel the hip release rather than bounce.
Advanced 9: Alternate between stillness and movement on each side.
Advanced 10: Practise with less hand support if the shape feels steady and spacious.
A Few Lovely Things to Say in Class
Sometimes a pose lands better when it is wrapped in kinder words.
You might say:
“Let one hip have its turn.”
“Make space for the baby and keep the breath easy.”
“Lift a little, soften a little, and let the movement stay kind.”
“Keep the spine tall and the jaw soft.”
“One side may feel different, and that is perfectly normal.”
That last one is worth remembering. Most babies are not especially concerned with symmetry. They are much more likely to appreciate a mother who is breathing calmly, moving gently, and not becoming emotionally entangled with the right hip.
Conclusion: One Hip at a Time
Butterfly III for prenatal yoga is gentle, focused, and very useful. It builds beautifully on Butterfly I and Butterfly II by keeping the same general family of hip-opening work, but making it more specific to one side at a time. First the body settles. Then it softens. Then each side gets a little extra care. It is a sensible little sequence, which is really another way of saying it is quite lovely.
The beauty of prenatal yoga is that it does not need to be dramatic to be effective. Butterfly III can be small, slow, supported, and still bring meaningful relief.
For access to hundreds more pregnancy-safe exercises, teaching ideas, and class-planning resources, explore the Online Pregnancy Lesson Planner.