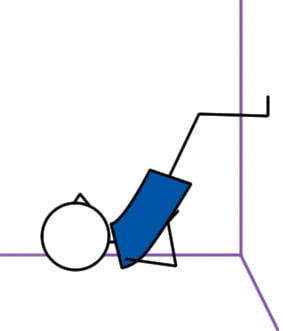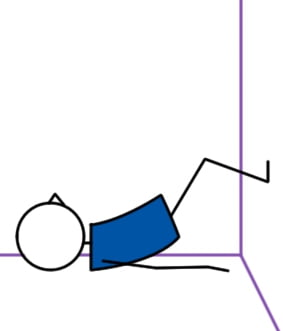
Shoulderstand Against Wall I
| Sanskrit Name: | Sarvangasana |
|---|---|
| Similar Pose Names: | Salamba Sarvangasana, Kandrasana |
| Category: | Seated & Floor |
| Share on: |
 Yoga Lesson Planner
 Pilates Lesson Planner
| Category: | Yoga Lesson Planner |
|---|---|
| Sub Category: | Seated & Floor |
| Types: | Arm Balance, Balance, Inversion, Seated & Floor, Strengthen |
| Anatomy: | Arms & Shoulders, Biceps & Triceps, Core, Neck, Wrists & Arms |
| Chakras: | Crown Centre, Heart Centre, Solar Plexus Centre, Third Eye, Throat Centre |
| Therapy: | Back Pain, Confidence Building, Depression, Headaches, Indigestion, Leg Congestion, Poor Posture, Stress, Varicose Veins |
| Drishti: | Up |
| Dosha: | Pitta, Vata |
Lie on your side with your buttocks against the wall. Raise your legs up the wall and lie on your back. Bend knees and put soles of feet against the wall. Walk feet up the wall. Keep knees at a 90-degree angle. Support back with hands. Hold. Come out of the pose by bending knees and lowering hips to the mat.
Balance. Calming. Reduces insomnia. Eases digestive disorders.
Straighten legs into inclined plane.
HBP. Neck or back injury. Pregnancy. Glaucoma.
Click here for lots of FREE downloadable Yoga lesson plans.
Click here for lots of FREE downloadable Pilates lesson plans.
- MedYoga: Beginners Postures
- Integral-style Yoga Week 11
- Integral-style Yoga Week 6
- Ask Genie1
- Invert Your Spine
- Upper Body - Bring in Light
- Ask Genie1
- Ask Genie1
- retro style yoga
- Relaxation 6-week course lesson 1
- Beginner Class 5 - Salamba Sarvangasana
- Adult Class
- Beginner Class 5 - Salamba Sarvangasana - Copy
- Integral-style Yoga Week 3
- Adult Class 21 November 2016
- Integral-style Yoga Week 5
- Integral-style Yoga Week 7
- Integral-style Yoga Week 8
- Integral-style Yoga Week 9
- Integral-style Yoga Week 10
- Integral-style Yoga Week 12
- Beginners Purna Sequence Week 3 - Forward bends/Inversions
- Integral-style Yoga Week 12
- Integral-style Yoga Week 11
- Ask Genie3
- 18 Inversions: Dare To Defy Gravity
- Loosen up the Hamstrings
- Inversions
- Beginner Class 5 - Salamba Sarvangasana - Copy
- Beginners Purna Sequence Week 3 - Forward bends/Inversions
- Yoga for back pain relief "Decompress: Eliminate excess"
- Back to basics
- WH 10/5
- Personal Practice
- YogaBellies for Back Pain
- YogaBellies for Back Pain
- YogaBellies for Back Pain - Copy -
- retro style yoga
- Yoga for back pain
- J All Levels Peak Pose Camel
- Saturday Morning 9.30
- Saturday Morning 9.30
- Camel - Yoga
- Dharana - focus on breath
- Vishuddhi Sequence
- Yoga for back pain relief \
- Lesson plan 2
- Inversions
- Detox Yoga Thursdays
- Macapple Chic Indigo Yoga
- Detox Yoga Thursdays
- Forward Bends 6 Feb 18
- Forward Bends 7 Feb 18
- 2.7 yoga
- lesson plan 8 - Headstand
- Spring 2019
- Bramacharya
- personal plan - golf
- Saturday Sunrise Sun Salutaions
- J All Levels Peak Pose Camel
- 90 Minute Yoga: Shoulderstand
- 1, yoga flow with middle back focus
- Vata & Autumn Practice
- 1, yoga flow with middle back focus
- Couples program - middle back focus + wall
- Cavendish 29Jan 2019
- Cavendish 4 Feb 2019
- Cavendish 11 Feb 2019
- Yoga for back pain relief \\
- Golf
- Tuesday 3.7
- Tuesday 3.8
- Power 1
- stretching and relaxing the back
- Tuesday 4.9
- online 14 April 2020
- Ask Genie1
- online 26 May 2020
- Yoga for back pain relief \\\\ - Copy
- JY CHAKRA-5-Vishuddha 75-mins (9th/16th July 2020)
- JY CHAKRA-5-Vishuddha 75-mins (9th/16th July 2020)
- Preparation For Shoulderstand: 28 Inversions
- SATURDAY SUNRISE POSITIVE VIBES
- Peak Pose: Shoulderstand
- 12 Shoulderstand Variations
- General Preparation For Shoulderstand
- Weight Room 20-30 second holds
- Ickenham 15 Nov 21
- Ickenham 22 Nov 21
- Ask Genie1
- Ask Genie1
- 123, zoom
- 12 Shoulderstand Variations
- General Preparation For Shoulderstand
- Preparation For Shoulderstand: 28 Inversions
- Beckett Wednesday
- Ask Genie 3
- Ask Genie 1
- Ask Genie 2
- stretching and relaxing the back
Shoulderstand Pose (Sarvangasana) Themed Yoga Lesson Plan: Free Download
This shoulderstand pose themed yoga lesson plan was created using the Yoga Genie Lesson Planner. Shoulderstand pose is the peak pose.
Peak pose themed lesson plans are a favourite for most yoga teachers.
You almost certainly learned how to create a peak pose themed lesson plan during your yoga teacher training, but just in case you have a hankering to learn more, here’s my formula on how to sequence around a peak pose.
Free Downloads
Short Lesson Plan Download
Shoulderstand Peak Pose Yoga Lesson Plan (short plan)
Each yoga lesson plan you create within the Yoga Genie Lesson Planner comes with a short version of the lesson plan. The short version is perfect for taking into class with you. It’s short and sweet.
Long Lesson Plan Download
Shoulderstand Peak Pose Yoga Lesson Plan (long plan)
Each yoga lesson plan you create within the Yoga Genie Lesson Planner comes with a long version of the lesson plan. The long version has everything you need to practice the lesson plan before getting to class. You can take it to class with you (but you may prefer to take the short version). The long version is a great handout to give to your students, especially your one-to-one students. It immediately shows your professionalism, and increases your expertise in the eyes of your students.
Stream Lesson Plan
Shoulderstand Peak Pose Yoga Lesson Plan (stream plan)
Each yoga lesson plan you create within the Yoga Genie Lesson Planner comes with a video stream version of the lesson plan. You’ll be able to provide the streams to students as a URL, so they can practice from home.
8 Nifty Benefits Of Shoulderstands
There’s a good reason shoulderstands were referred to as the “King/Queen Of Asana” by the ancient yogis…
1. Relieves Stress: Shoulderstand is a cooling posture, it helps draw attention inwards. Practice if you have anxiety, stress, or fear. Combine headstand with yogic breathing (long, slow breaths) and you have a recipe for instant calm.
2. Increases Focus: When you turn upside down, you increase blood flow to the brain. This can help to improve mental function and increase your sense of focus.
3. Strengthens Shoulders & Arms: While holding yourself up in a shoulderstand, you are pushing down into the ground with your forearms, to keep pressure off your head and neck.
4. Improves Digestion: When you allow the effects of gravity to be reversed on your digestive organs, you will help to move stuck material, release trapped gases, as well as improve blood flow to the all-important digestive organs – increasing nutrient absorption and delivery to your cells.
5. Helps Flush Out Adrenal Glands: Going upside-down will squeeze your little adrenal glands, which are responsible for the production of those so-called stress hormones. The cleaner your adrenal glands are, the more optimal they will function.
6. Decreases Fluid Build-Up In Legs, Ankles, and Feet: Edema in the legs is no fun, and it can happen if you spend long hours on your feet. Reversing the effects of gravity on your bodily fluids will help to flush out built-up water in the legs, relieving the uncomfortable feeling of oedema.
7. Develops Core Muscle Strength: Shoulderstand is an amazing core workout. You will rely on your core strength and arms to hold your legs up and keep your balance throughout the pose.
8. Stimulates The Lymphatic System: Your lymph system can also be called your rubbish dump system. This network of nodes and fluids helps to remove waste products from your blood. When you flip onto your head you will be directly stimulating your lymphatic system which helps to remove toxins from your body.
Shoulderstand Pose Teaching Tips
The Shoulderstand Pose (also known as Sarvangasana in Sanskrit) is known as the queen of all yoga poses because of the benefits it provides for the whole body. But it’s potentially the most dangerous pose to practice for a newbie Yogi.
Your students should NOT practice Shoulderstand pose if he/she is:
- suffering from high blood pressure
- suffering from weak eye blood vessels
- suffering from glaucoma or detached retina
- suffering from a neck injury
- suffering from Cervical Spondylities
- menstruating
Build Up To Shoulderstand Pose Over 6 Classes
I personally would only teach shoulderstand pose without blocks and props to an advanced class of experienced yogis (see shoulderstand pose modifications below).
If, however, you have small classes (e.g. 8 people or less), and your students are experienced, I recommend spending 6 classes building up to shoulderstand pose by giving a few modifications. It’s crucial to make sure everyone knows the golden rules of practicing shoulderstand pose (see golden rule below). Then, and only then would I allow the pose to be practiced in my class.
Teach Shoulderstand Pose In A Circle
Because technique is so important, I get my students to form a circle around me and my mat. I then demonstrate shoulderstand pose (sarvangasana), while emphasising the golden rule (see golden rule below).
I would then ask one student at a time, who wanted to try the pose to join me in the circle. Not everyone will want to try doing shoulderstand pose without a modification (e.g. if they have neck problems, obesity, high blood pressure). So, if you do have a student that you know shouldn’t be doing full shoulderstand pose, who wants to do it, explain gently that if they really want to do this pose, they need to do the modifications for a few months. This will have the added benefit of teaching the student discipline, patience and the philosophy of “less is more”.
With everyone watching, I would guide him/her into the pose. Each time a student watches a fellow student practice the pose with me guiding/talking through it, they become more aware of the correct technique. I can’t think of another pose in Yoga where technique is so important, which is why it’s vital to spend a lot of time on the technique.
Golden Rule For Teaching Shoulderstand Pose
Always, always, always place 2 to 4 folded blankets under your shoulders and arms. This will support shoulders properly. Supporting shoulders on 2 to 4 folded blankets in shoulderstand pose (sarvangasana), with the head at a lower level, helps protect the neck by reducing the amount that it has to flex to achieve the pose. The blankets open up the angle between the neck and the body.
Shoulderstand Pose Modifications
The beauty of shoulderstand pose modifications is that they are safe and students receive 99% of the benefits of the full pose.
Many Yoga teachers will go their entire careers without ever teaching full shoulderstand pose (especially if they teach large classes to beginners) because there are so many good modifications to use.
Head & Shoulders
Head
Place a thin blanket under the back of the head so that the head doesn’t stick to the floor.
Shoulders
Prop the shoulders enough so that there is a space under the neck for the natural lordotic curve of the cervical spine to remain intact (no flattening of cervical spine) and the upper back to lift. A beginner teacher usually doesn’t provide the student enough blankets under the shoulders. If you watch the modified shoulderstand videos below, you’ll see 3 or 4 blankets are used under the shoulders.
Props To Use
Below are the recommended props needed when teaching shoulderstand pose…
Blankets
4 thick blankets (folded neatly), or a bolster to go under the shoulders.
Strap
A strap to help gather and hold upper arms (just above elbow) that is pre-measured to be shoulders’ distance apart. They will have to put this on once they are partway up into the pose, and take it off before they come out.
Blocks
You don’t want your students to crash down to the floor. A block or two is needed to support your student’s back before they go up and when they come out. You can also use 3 or 4 folded blankets. Or you can use a bolster.
Shoulderstand Pose With Hips On Blocks Modification
The safest way to get the benefits of shoulderstand pose (sarvangasana), without the possibility of damaging neck ligaments, is to place your hips on blocks. Make blocks available to students in your yoga class, and recommend that they get two blocks of their own. It’ll be a great investment for their health. Because the body isn’t at a 90 degree angle, the pressure is taken off the neck, which makes this modification a very attractive one to give to students.
Shoulderstand Pose With Chair, Bolster, Blankets & Wall Modifications
Half Shoulderstand Pose
If you have a fairly experienced Yogi in your class who isn’t ready for full shoulderstand, and doesn’t want to use any props (blankets aren’t a prop, they are absolutely needed to prevent injury), then demonstrate Half Shoulderstand for them. Then, closely observe their technique.
There is no graceful entrance to Half Shoulderstand, so your student will almost certainly jerkily throw their legs over their heads (upper back will fall to the floor). In this shape, the weight of the lower body is anchored to the upper back rather than the shoulders, and it’s difficult to find the action that you’ll need to do the full version of the pose. The plus side is because the weight is on the upper back, the neck is not forced into full flexion, which dramatically increases the chance of a neck injury.
Less Is More
To recap…
I recommend your students get used to doing shoulderstand modifications with props (chairs, wall, bolsters, blocks, straps), before moving onto Half or Full Shoulderstand.
Explain to your students that sometimes in life, less is more.


